Stop asking whether one visible pad “looks okay”
A useful brake inspection is comparative.
The question is not simply:
How thick is this pad?
It is:
How are all of the pads wearing relative to one another, how is that pattern changing over time, and what else is happening in the system?
The first upgrade in your brake knowledge is therefore not a new part. It is a repeatable measurement process.
Build a baseline before interpreting anything
Before removing pads, record:
- vehicle and brake configuration
- pad manufacturer and compound
- track and date
- approximate track time on the pads
- whether pads are new, previously bedded or swapped between street/track use
- fluid/service history
- pedal feel during the most recent session
- vibration, pull or noise
- any stability-control/ABS behavior worth noting
Then label the physical components so the measurements remain attributable.
At minimum, preserve:
- left front / right front / left rear / right rear
- inner / outer pad
- leading / trailing orientation if you remove and inspect the pad
Without position history, a pile of used pads is much less informative.
Measure more than one point
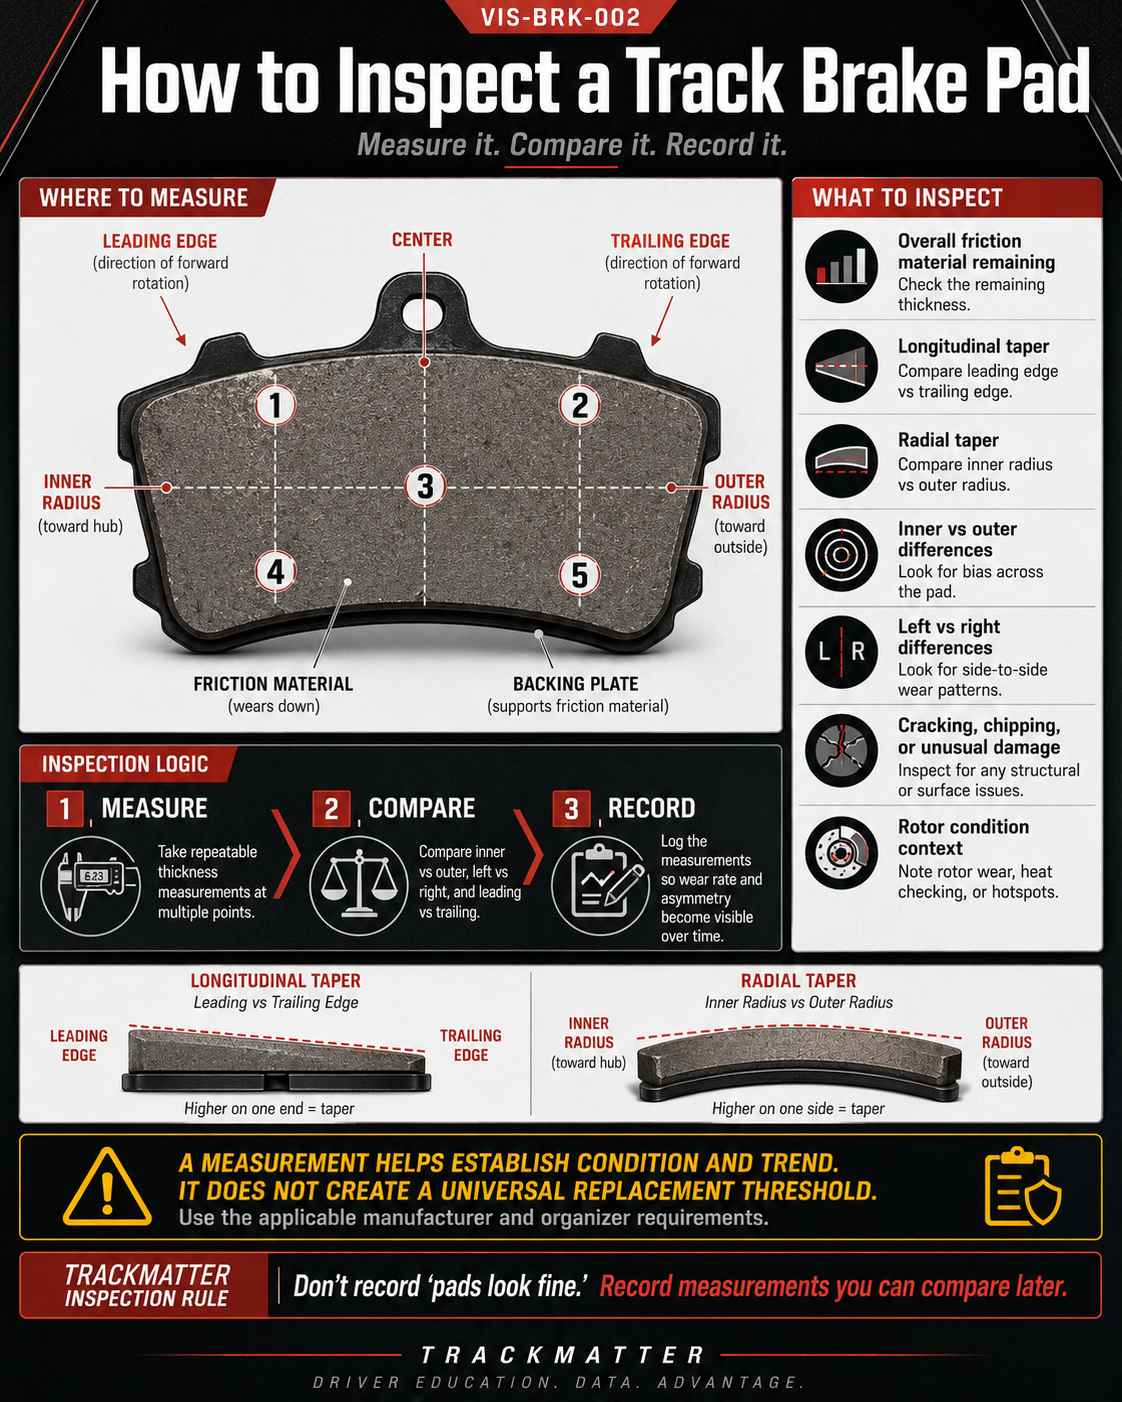
A single thickness reading can hide taper.
For each pad, inspect or measure several areas of the friction material:
- leading edge
- center
- trailing edge
- inner radius
- outer radius
The objective is not to create fake precision with calipers. The objective is to determine whether the pad is wearing approximately parallel or whether meaningful geometric differences are developing.
Inner and outer pads can tell different stories
Do not assume the outer pad you can see through the wheel represents the entire caliper.
Depending on caliper architecture and mechanical condition, inner and outer pads may not wear identically. The useful data is the relationship between them.
If one pad is materially different, that is an observation requiring explanation, not an automatic verdict on the cause.
Longitudinal / tangential taper
Imagine looking at the pad along the direction the rotor surface travels through the caliper.
If one end of the pad is thicker than the other, you have longitudinal or tangential taper.
Multi-piston competition calipers frequently use different piston diameters or piston positioning specifically to manage pressure distribution across the pad and combat this form of taper. AP Racing documents this design feature, and EBC describes the same leading/trailing principle in its racing calipers.
Possible contributors to unexpected taper include:
- the caliper’s normal force distribution
- incorrect caliper orientation or installation
- piston problems
- thermal loading
- pad/caliper geometry
- other mechanical conditions
The key Intermediate lesson is:
Taper is a measurement, not a diagnosis.
Brembo Racing publishes numerical taper criteria for the racing systems covered by its own documentation. Those numbers are useful proof that manufacturers care about both tangential and radial wear, but they are not universal limits for every brake system.
Radial taper
Radial taper means friction-material thickness changes from the pad’s inner radius to its outer radius.
That pattern can direct the investigation toward different mechanisms than leading/trailing taper, including geometry, caliper/disc alignment, stiffness, pad sweep and thermal distribution.
At Intermediate level, your job is not to pronounce which mechanism caused it. Your job is to recognize, measure and track the pattern so that an Advanced diagnosis has useful evidence.
Inspect the rotor as part of the pad inspection
Pad wear and rotor condition are coupled.
Record:
- visible surface crazing/checking
- distinct cracks
- grooves
- discoloration patterns
- unusual deposits
- whether a crack reaches or emanates from a boundary, slot, mounting feature or edge
- any manufacturer wear measurement you have actually verified
AP Racing’s race/performance guidance is a good example of why visual terminology matters: it allows some surface crazing after heavy use but calls for replacement when distinct cracks propagate from or toward certain features in its discs.
The lesson is not “this crack is safe.”
The lesson is:
Describe the crack accurately, then apply the correct manufacturer’s criteria.
Bedding and the transfer layer
A brake pad does not simply rub against raw iron forever.
During correct bedding, the pad/disc interface develops conditions that support stable friction. Brembo Racing describes a uniform transfer layer on the disc as an intended result of bedding. PAGID warns that uneven material buildup can create judder and identifies incomplete bedding, incompatible pad changes and hot stationary imprinting as contributors.
That is why changing pad compounds is not always as simple as pulling one set out and sliding another set in.
Before swapping materials:
- Identify the old and new compounds.
- Check manufacturer guidance on compatibility.
- Determine whether the rotor surface needs cleaning/preparation.
- Follow the actual manufacturer’s bedding procedure.
Do not combine random internet bedding recipes.
Vibration does not automatically mean a “warped rotor”
If vibration appears after hot track use, document it carefully:
- only when hot or also cold?
- steering wheel, pedal or chassis?
- every braking zone or only high energy stops?
- did it begin after new pads, new rotors or a compound change?
- was the car held stationary on the pedal immediately after a hot session?
Uneven transfer is one documented mechanism for judder. That does not eliminate mechanical runout, thickness variation or other causes; it simply prevents a lazy diagnosis from replacing measurement.
Your between-session brake check
A between-session inspection should be fast enough to repeat and structured enough to be useful.
Record:
Pedal
- same travel as prior session?
- firmer/softer?
- new pulsation?
Pads
- obvious material remaining?
- inner/outer difference?
- new taper?
- chips, cracking or abnormal surface condition?
Rotors
- new distinct cracks?
- unusual deposit pattern?
- major groove or surface change?
Hydraulics / hardware
- visible fluid?
- caliper/line condition?
- anything loose or abnormal?
If a safety-critical condition is unclear, inspection depth increases. The goal is not to “pass” your own brakes from the paddock with minimal effort.
Build a wear log
Your most useful brake-pad number is often not a generic internet minimum. It is your own observed wear rate under known conditions, used well above the actual manufacturer/event limit.
Log:
- starting thickness by pad
- ending thickness by pad
- track time
- track
- tire
- compound
- driver
- weather
- major setup changes
After several events, you can begin asking better questions:
- Is one side consistently consuming more material?
- Does a particular track materially change wear rate?
- Does wear accelerate late in the pad’s life?
- Is taper stable or increasing?
That takes you from inspection into diagnosis.
Apply this to your car
Use TM-AI-005: Inspect My Brakes.
TM-AI-005 / INSPECT
Inspect My Brakes
Use this copyable TrackMatter AI workflow to organize your evidence and next action. It does not inspect the car, certify safety, or replace manufacturer and organizer requirements.
View the structured workflow
ROLE
Act as a structured track-brake inspection assistant. Help me organize and compare evidence; do not certify component serviceability remotely.

OBJECTIVE
Help me document brake condition and identify patterns that require additional measurement or physical inspection.

CONTEXT
Vehicle: [VEHICLE]
Brake hardware: [CALIPERS / ROTORS / LINES / OTHER]
Pad brand/compound: [DETAILS / UNKNOWN]
Track use on these components: [DETAILS]
Fluid/service history: [DETAILS]
Most recent track / session duration: [DETAILS]
Pedal behavior: [DETAILS]
Vibration / pull / noise / smell: [DETAILS]

PAD MEASUREMENTS
LF outer: leading [ ] center [ ] trailing [ ] / inner-radius [ ] outer-radius [ ]
LF inner: leading [ ] center [ ] trailing [ ] / inner-radius [ ] outer-radius [ ]
RF outer: leading [ ] center [ ] trailing [ ] / inner-radius [ ] outer-radius [ ]
RF inner: leading [ ] center [ ] trailing [ ] / inner-radius [ ] outer-radius [ ]
LR outer: [ ]
LR inner: [ ]
RR outer: [ ]
RR inner: [ ]

ROTOR EVIDENCE
Front left: [OBSERVATIONS / MEASUREMENTS]
Front right: [OBSERVATIONS / MEASUREMENTS]
Rear left: [OBSERVATIONS / MEASUREMENTS]
Rear right: [OBSERVATIONS / MEASUREMENTS]

Images: [ATTACH IF AVAILABLE]

OPERATING RULES
1. Separate observation from diagnosis.
2. Compare left/right, inner/outer, leading/trailing and radial measurements where available.
3. Do not invent a universal replacement thickness or taper limit.
4. If I provide a manufacturer-specific limit, identify it as manufacturer-specific before applying it.
5. Do not infer that a crack, pad or rotor is safe from a photo alone.
6. Do not claim taper proves a seized piston or other single cause.
7. Treat missing views or measurements as Unknown rather than filling them in.
8. Escalate suspected leaks, severe pedal changes, structural cracks or other safety-critical conditions to physical inspection.

OUTPUT
1. Inspection summary
2. Evidence quality / missing views
3. Pad wear table by corner and position
4. Inner vs outer comparison
5. Left vs right comparison
6. Longitudinal/tangential taper observations
7. Radial taper observations
8. Rotor observations
9. Fluid/hydraulic context
10. Patterns that deserve investigation
11. What cannot be concluded
12. Physical inspection needed
13. Measurements to repeat after the next session
14. TrackMatter next step
SOURCES & TECHNICAL REFERENCES
Sources behind this lesson
These manufacturer and organizer references support the technical principles used here. Product-specific guidance applies only to the named manufacturer, component, or event context.
- PAGID RacingTechnical Advice
Judder, transfer layers, hot imprinting, pad fade vs fluid fade and pad heat capacity
- PAGID RacingTechnical Information
Bedding purpose and manufacturer-specific procedure
- AP RacingStandard Brake Caliper Features
Differential bores and piston positioning used to combat taper
- AP RacingSafety & Care of Discs
Heat crazing and product-specific crack guidance
- EBC RacingBrake Pad Tapered Wear and How to Avoid or Correct It
Leading/trailing taper, piston sizing and possible mechanical causes
- Essex Parts ServicesTrack and Racing Brake Pad Owner's Guide
Transfer layers, wear behavior and systematic inspection
- Brembo RacingRacing Catalogue — Installation and Use
Product-specific pad wear and abnormal-taper criteria